
Table of Contents
Note: Kubernetes uses some Docker-like containers tool so remember you won’t be able to run a Windows-based container on a Docker host with Linux on it – because Docker uses the host machine kernel.
However, there are ways to work around this limitation:
- Docker for Windows with WSL2: Docker Desktop for Windows can use the Windows Subsystem for Linux 2 (WSL2) to run Linux containers on Windows by providing a Linux kernel within the WSL2 environment.
- VMs and Hyper-V: You can run a virtual machine (VM) with the appropriate operating system kernel (Linux or Windows) on your host machine. For example, you can run a Linux VM on a Windows host or a Windows VM on a Linux host, and then run the corresponding Docker containers within that VM.
VMs vs Docker:
- VMs have their own OS
- Docker share OS (kernel part) with host machine
- VMs are completely isolated
Container orchestration – containers deployment and management.
Node (minion) – is a machine (physical or virtual) where Kubernetes is installed and is launched. A worker machine.
Cluster – set of nodes grouped together.
Master – a node with Kubernetes installed and configured as “master”. It watches over the nodes in the cluster. Orchestrates the nodes.
Kubernetes components:
- API server – the frontend for Kubernetes; users, management devices, CLIs – all use API server to interact with Kubernetes cluster
- etcd – distributed key-value store used by Kubernetes to store all the data used to manage the cluster. Ensures there are no conflicts between the masters
- kublet – agent running on each node in the cluster. Checks that the containers are running on nodes as expected
- Container runtime – underlying software used to run containers (for example Docker, rkt, CRI-O)
- Controller – responds to nodes/containers/endpoints going down. Decides to spin up new containers in such scenarios
- Scheduler – distributes work or containers across nodes. Assigns newly created containers to nodes
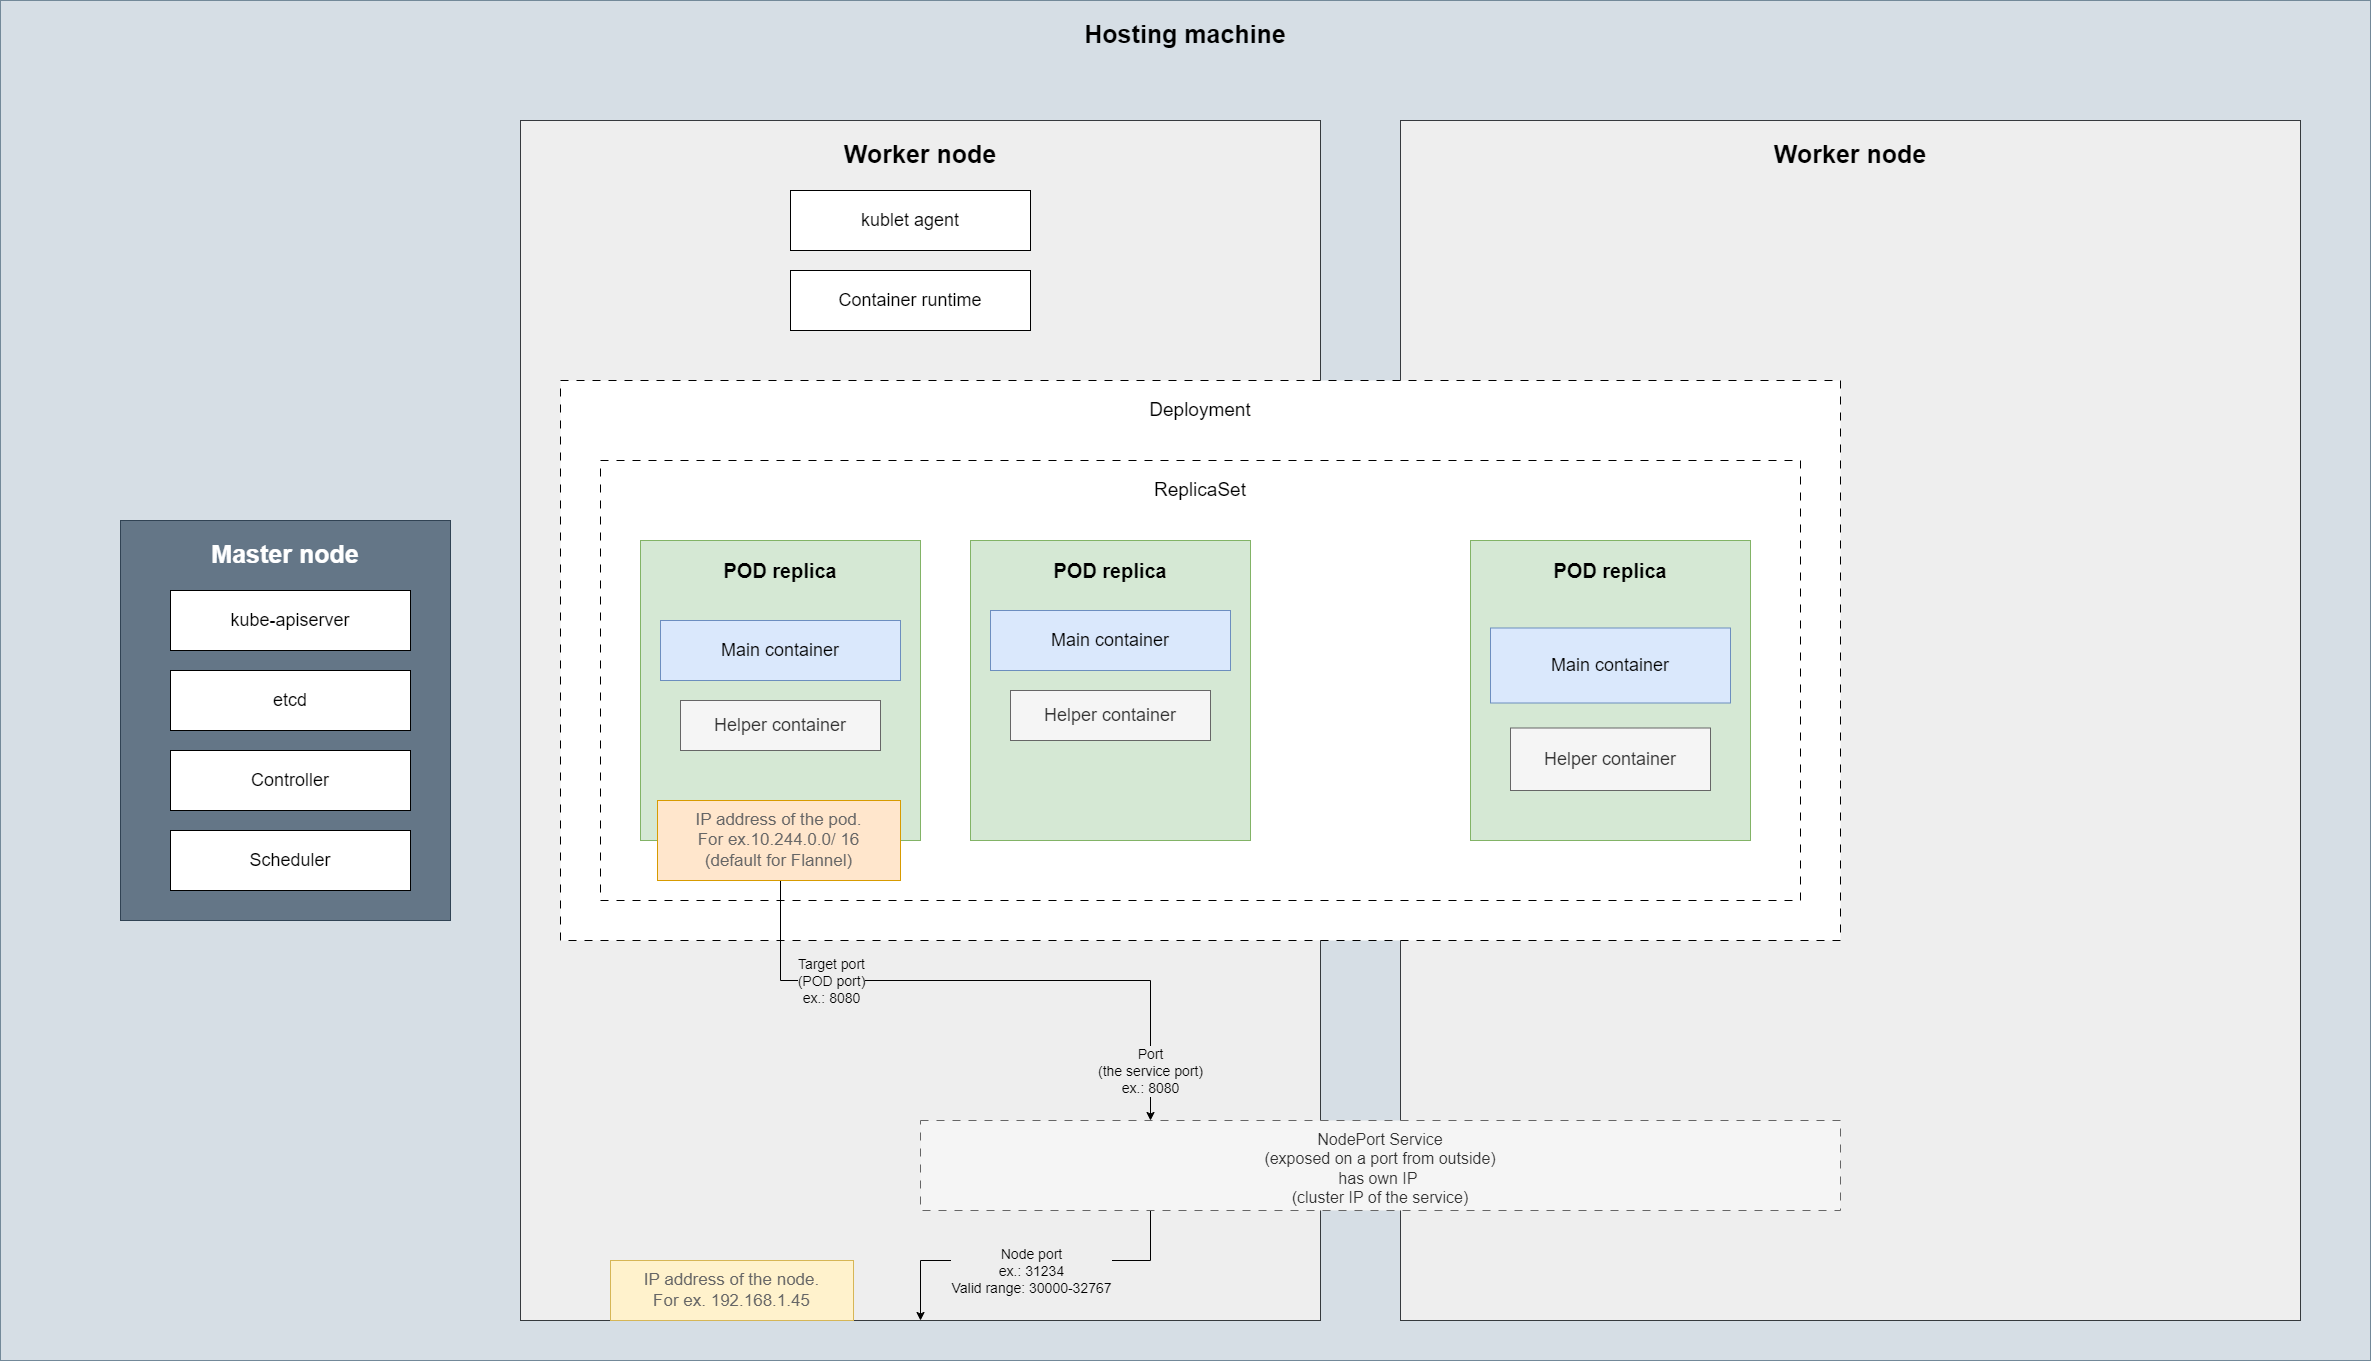
Master node contains:
- kube-apiserver
- etcd
- Controller
- Scheduler
Worker node contains:
- kublet agent
- Container runtime
kubectl (kube control) – CLI used to deploy and manage applications on a Kubernetes cluster
- kubectl run someapp – used to spin up an application called someapp in Kubernetes cluster
- kubectl cluster-info – used to view info about the cluster
- kubectl get nodes – list all nodes of a cluster
PODs
Containers running on a node are encapsulated in a Kubernetes object called POD.
- A POD is a single instance of an application.
- A POD is the smallest object one can create in Kubernetes (not containers)
- Each container of a certain application runs in a separate POD.
- Each POD usually encapsulates single container of a specific application.
- A POD can contain multiple containers but those should be from different applications/kind (main + helper containers)
- Main and helper containers can communicate between each other using localhost as they share the same network space + they can share the same storage space
There are several scenarios where you might want to run multiple containers within a single pod:
- Sidecar Containers: These containers extend and enhance the functionality of the main container. For example, a sidecar container could handle logging, monitoring, or proxying.
- Adapter Containers: These containers can standardize and modify the output of the main container to fit the requirements of another system or service.
- Ambassador Containers: These containers can act as a proxy to other services, helping to manage communication between the main container and the outside world.
POSs are very handy when a container needs some additional helper container to run along, as these will have the same lifecycle as the main container.
kubectl
- kubectl run nginx –image nginx – Deploys a Docker container by creating a POD automatically. It pulls the alpine image from Docker hub.
- –dry-run – preview the object that would be sent to your cluster, without really submitting it
- may combine with -o yaml to see the definition YAML for it
- add: > [some-yaml-name].yml to save that
- may combine with -o yaml to see the definition YAML for it
- –dry-run – preview the object that would be sent to your cluster, without really submitting it
- kubectl create
- kubectl create -f [some-definition-file].yml
- alternative to it is the kubectl apply -f [some-definition-file].yml
- kubectl apply will update or create while kubectl create will only create
- kubectl apply needs an YAML as an input – provided using the -f option, or -k (Kustomize) or by simply echoing the YAML content directly
- Warning: resource pods/redis is missing the kubectl.kubernetes.io/last-applied-configuration annotation which is required by kubectl apply. kubectl apply should only be used on resources created declaratively by either kubectl create –save-config or kubectl apply. The missing annotation will be patched automatically.
- If you try to create a POD that has a label matching a replica set, the POD lifecycle will be controlled by the ReplicaSet – meaning it may get terminated right away if for that label match the number of replicas Running matches the definition of the replica set
- –record – instructs for recording of the cause of change. Record current kubectl command in the resource annotation (metadata.annotations. kubernetes.io/change-cause)
- Sample definition:
- alternative to it is the kubectl apply -f [some-definition-file].yml
- kubectl create -f [some-definition-file].yml
apiVersion: v1
kind: Pod
metadata:
  name: nginx
  labels: # these are used by the ReplicaSet when matching
    app: nginx
    somekey: somevalue
spec:
  containers:
    - name: nginx
image: nginx- kubectl create deployment:
- Specifically, for creating and managing Deployment resources
- Manages replica sets and ensures the desired number of pod replicas.
- Ideal for production applications that require scaling and rolling updates.
- kubectl run:
- More general-purpose, originally for creating pods but now capable of creating various resource types with appropriate flags.
- Does not manage replicas unless explicitly creating a deployment with the appropriate flags.
- Ideal for development, testing, and running single pods or ad-hoc tasks.
- Specifically, for creating and managing Deployment resources
- kubectl replace -f [definition-filename].yml
- will update an object based on the modification in the definition file – for example change the number of pods in a ReplicaSet
- kubectl scale –replicas=[number of desired replicas] -f [definition-filename].yml
- will change the number of replicas of the object previously created using the [definition-filename].yml; does not update the file
- btw, this can be both an increase or a decrease in number of replicas
- can be also used by indicating name of the ReplicaSet or ReplicationController:
- kubectl scale –replicas=3 replicationcontroller [replication controller name]
- kubectl scale –replicas=3 replicaset [replica set name]
- kubectl get
- kubectl get all – list all the objects created in Kubernetes
- kubectl get pods – lists the pods
- -l [labelkey]=[labelvalue] – get only pods with specific label
- -o wide will make the output more verbose by adding some more columns
- kubectl get replicaset – get list of current ReplicaSet
- kubectl get rs – just an alias for kubectl get replicaset
- kubectl get replicaset [replica set name] -o yaml > [somedefinitionfilename].yml – will “export” the definition of a replica set
- kubectl get replicationcontroller – get list of current ReplicationController
- kubectl get deployments – get list of current Deployments
- kubectl describe [resource type] [resource name] – returns detailed info about specific POD. Note: you may combine the resource type and resource name as a prefix and then use the form kubectl describe [resourcename with prefix]
Ex: kubectl describe deployment deployment.apps/someapp-deployment – here deployment is the resource type and apps is the API group - kubectl label pod [podname] [labelkey]=[labelvalue]
- kubectl delete
- kubectl delete pod [pod name] [, … other pod names separated by comma] – deletes a specific pods
- Will delete the pod but another one will be created if it was part of a replica set
- kubectl delete -f [refinition filename].yml – will remove whatever is defined in the definition file
- kubectl delete replicaset [name of replica set]
- kubectl delete rs [name of replica set] – alias
- removes the replica set and its pods
- kubectl delete pod [pod name] [, … other pod names separated by comma] – deletes a specific pods
- kubectl describe
- kubectl describe replicaset [replica set name] – get description of a replica set
- kubectl edit
- kubectl edit replicaset [replica set name] – opens a temporary definition file and after we modify and save the definition file, the new definition is applied. Does not edit the initial definition file.
- kubectl explain [some command] – describe fields and structure of various resources.
- kubectl rollout
- kubectl rollout status [name of the deployment] – check rollout status
- kubectl rollout history [name of the deployment] – list the revisions of a specific deployment. When using kubectl rollout history to view the history of deployments in Kubernetes, you may notice that if two versions have identical contents, Kubernetes treats the later version as the active one and effectively ignores the earlier one.
- kubectl rollout undo [name of the deployment] – roll back latest update
- kubectl rollout undo [name of the deployment] –to-revision=[number of the revision] – for rolling back to specific revision number
- Interestingly when rolling back to a revision, the old revision is dropped and it is now the latest with latest number. So, for example if you had #3 and #4 (current) and rolled back – #3 will disappear and #5 will be the latest – actually being a copy of #3.
- kubectl set
- kubectl set image deployment [deployment name] [container name]=[image name] – change the image of a POD that is part of a deployment. Important: this will generate a new revision BUT there will now be a discrepancy between the definition file and the actual PODs images being used
- kubectl logs -p [pod name] – shows the logging output for a specific POD. Great when trying to understand why a POD is continuously trying to restart
YAML
Arrays/lists in an YAML are ordered collections. Meaning even if they contain the same elements but in different order – the arrays/lists will be considered different.
It is recommended to use 2 spaces for indentation in YML rather than tabulation.
Dictionaries are unordered. Internal attributes’ order won’t affect equality of two dictionaries.
https://luispreciado.blog/posts/kubernetes/core-concepts/pod-yaml
A Kubernetes definition file always contains 4 top level required fields:
- apiVersion – version of Kubernetes API that supports specific kind we plan to use
- kind – type of object to be created: Pod, Service, ReplicaSet, Deployment
- metadata – data about the object: name, labels etc. A dictionary, not a single value.
Has 2 children:- name – a name you give to your Pod etc.
- labels – a dictionary with any key and value you may need
- spec – provide additional info to Kubernetes for specific object type chosen in kind
Replication Controller
Replication Controller (replaced now by Replica Set)– helps run multiple instances of a single POD in the Kubernetes cluster for high availability. Monitors the PODs
It can span across multiple nodes if the PODs replicas need more resources than those provided by single node
apiVersion: v1
kind: ReplicationController
metadata:
  name: someapp-rc
  labels:
    app: someapp
    type: front-end
spec:
  template: # a nested definition - will contain all the definition file metadata and spec for a Pod
    metadata:
      name: nginx
      labels:
        app: nginx
        tier: frontend
    spec:
      containers:
        - name: nginx
          image: nginx
  replicas: 3
ReplicationController is deprecated and replaced by ReplicaSet (available in apps/v1 definition apiVersion)
apiVersion: apps/v1
kind: ReplicaSet
metadata:
  name: someapp-replica-set
  labels:
    app: someapp
    type: front-end
spec:
  template: # a nested definition - will contain all the definition file metadata and spec for a Pod
    metadata:
      name: nginx-pod
      labels:
        app: nginx
        tier: frontend
    spec:
      containers:
        - name: nginx-container
          image: nginx # reference to Docker hub image tag
  replicas: 3
  selector: # require as may reference pods created in advance - thus, not part of the replica set
    matchLabels:
app: nginxFor creating this type of objects in Kubernetes kubectl create -f [fileName].yml is used
C:\Leaning\Kuberbetes>kubectl get pods
NAME                        READY   STATUS    RESTARTS   AGE
someapp-rc-dw9b9            1/1     Running   0          118s
someapp-rc-lmv5f            1/1     Running   0          118s
someapp-rc-wllxl            1/1     Running   0          118s
someapp-replica-set-5frxt   1/1     Running   0          7s
someapp-replica-set-5qs7z   1/1     Running   0          7s
someapp-replica-set-z6dgl   1/1     Running   0          7s

C:\Leaning\Kuberbetes>kubectl get pods --show-labels=true
NAME                        READY   STATUS    RESTARTS   AGE   LABELS
someapp-rc-dw9b9            1/1     Running   0          13m   app=nginx,tier=frontend
someapp-rc-lmv5f            1/1     Running   0          13m   app=nginx,tier=frontend
someapp-rc-wllxl            1/1     Running   0          13m   app=nginx,tier=frontend
someapp-replica-set-5frxt   1/1     Running   0          11m   app=nginx,tier=frontend
someapp-replica-set-5qs7z   1/1     Running   0          11m   app=nginx,tier=frontend
someapp-replica-set-z6dgl   1/1     Running   0          11m   app=nginx,tier=frontend

C:\Leaning\Kuberbetes>kubectl label pod someapp-rc-dw9b9 newlabelkey=newlabelvalue
pod/someapp-rc-dw9b9 labeled

C:\Leaning\Kuberbetes>kubectl get pods -l newlabelkey=newlabelvalue
NAME               READY   STATUS    RESTARTS   AGE
someapp-rc-dw9b9   1/1     Running   0          16m

C:\Leaning\Kuberbetes>kubectl get pods --show-labels=true
NAME                        READY   STATUS    RESTARTS   AGE   LABELS
someapp-rc-dw9b9            1/1     Running   0          15m   app=nginx,newlabelkey=newlabelvalue,tier=frontend
someapp-rc-lmv5f            1/1     Running   0          15m   app=nginx,tier=frontend
someapp-rc-wllxl            1/1     Running   0          15m   app=nginx,tier=frontend
someapp-replica-set-5frxt   1/1     Running   0          14m   app=nginx,tier=frontend
someapp-replica-set-5qs7z   1/1     Running   0          14m   app=nginx,tier=frontend
someapp-replica-set-z6dgl   1/1     Running   0          14m   app=nginx,tier=frontend


C:\Leaning\Kuberbetes>kubectl get replicaset
NAME                  DESIRED   CURRENT   READY   AGE
someapp-replica-set   3         3         1       4s

C:\Leaning\Kuberbetes>kubectl get replicationcontroller
NAME         DESIRED   CURRENT   READY   AGE
someapp-rc   3         3         3       99s
Scaling ReplicationController and ReplicaSet
C:\Leaning\Kuberbetes>kubectl get pods
NAME                        READY   STATUS    RESTARTS   AGE
someapp-rc-dw9b9            1/1     Running   0          24m
someapp-rc-lmv5f            1/1     Running   0          24m
someapp-rc-wllxl            1/1     Running   0          24m
someapp-replica-set-5frxt   1/1     Running   0          22m
someapp-replica-set-5qs7z   1/1     Running   0          22m
someapp-replica-set-fwl7m   1/1     Running   0          8s
someapp-replica-set-z6dgl   1/1     Running   0          22m

C:\Leaning\Kuberbetes>kubectl scale --replicas=2 -f rc-definition.yml
replicationcontroller/someapp-rc scaled

C:\Leaning\Kuberbetes>kubectl get pods
NAME                        READY   STATUS    RESTARTS   AGE
someapp-rc-dw9b9            1/1     Running   0          25m
someapp-rc-wllxl            1/1     Running   0          25m
someapp-replica-set-5frxt   1/1     Running   0          23m
someapp-replica-set-5qs7z   1/1     Running   0          23m
someapp-replica-set-fwl7m   1/1     Running   0          39s
someapp-replica-set-z6dgl   1/1     Running   0          23m

C:\Leaning\Kuberbetes>kubectl scale --replicas=2 -f rs-definition.yml
replicaset.apps/someapp-replica-set scaled

C:\Leaning\Kuberbetes>kubectl get pods
NAME                        READY   STATUS        RESTARTS   AGE
someapp-rc-dw9b9            1/1     Running       0          25m
someapp-rc-wllxl            1/1     Running       0          25m
someapp-replica-set-5frxt   1/1     Running       0          24m
someapp-replica-set-5qs7z   1/1     Running       0          24m
someapp-replica-set-z6dgl   0/1     Terminating   0          24m

C:\Leaning\Kuberbetes>kubectl get pods
NAME                        READY   STATUS    RESTARTS   AGE
someapp-rc-dw9b9            1/1     Running   0          25m
someapp-rc-wllxl            1/1     Running   0          25m
someapp-replica-set-5frxt   1/1     Running   0          24m
someapp-replica-set-5qs7z   1/1     Running   0          24m

C:\Leaning\Kuberbetes>kubectl scale --replicas=3 replicationcontroller someapp-rc
replicationcontroller/someapp-rc scaled

C:\Leaning\Kuberbetes>kubectl get pods
NAME                        READY   STATUS              RESTARTS   AGE
someapp-rc-dw9b9            1/1     Running             0          27m
someapp-rc-wllxl            1/1     Running             0          27m
someapp-rc-xczzs            0/1     ContainerCreating   0          3s
someapp-replica-set-5frxt   1/1     Running             0          25m
someapp-replica-set-5qs7z   1/1     Running             0          25m

C:\Leaning\Kuberbetes>kubectl scale --replicas=3 replicaset someapp-replica-set
replicaset.apps/someapp-replica-set scaled

C:\Leaning\Kuberbetes>kubectl get pods
NAME                        READY   STATUS    RESTARTS   AGE
someapp-rc-dw9b9            1/1     Running   0          28m
someapp-rc-wllxl            1/1     Running   0          28m
someapp-rc-xczzs            1/1     Running   0          26s
someapp-replica-set-5frxt   1/1     Running   0          26m
someapp-replica-set-5qs7z   1/1     Running   0          26m
someapp-replica-set-w7hnw   1/1     Running   0          3s
Kubernetes Deployments
Rolling updates – upgrading an application by updating POD after POD rather than all the PODs at once.
Rolling back the update – reverting latest changes.
Deployments allows to:
- perform rolling updates
- roll back changes
- pause/resume changes
When creating a deployment, it automatically creates a replica set.
apiVersion: apps/v1
kind: Deployment
metadata:
  name: someapp-deployment
  labels:
    app: someapp
spec:
  selector:
    matchLabels:
      environment: development
  replicas: 3
  template:
    metadata:
      name: nginx # we cannot choose the pod names in a deployment
      labels: # these are used by the ReplicaSet when matching
        app: nginx
        somekey: somevalue
        environment: development
    spec:
      containers:
        - name: nginx
          image: nginx


C:\Leaning\Kuberbetes\deployments>kubectl create -f deployment.yml
deployment.apps/someapp-deployment created

C:\Leaning\Kuberbetes\deployments>kubectl get all
NAME                                      READY   STATUS              RESTARTS   AGE
pod/someapp-deployment-6cb8dd8b8c-8rw46   0/1     ContainerCreating   0          7s
pod/someapp-deployment-6cb8dd8b8c-ljk5q   1/1     Running             0          7s
pod/someapp-deployment-6cb8dd8b8c-z6xmk   1/1     Running             0          7s

NAME                 TYPE        CLUSTER-IP   EXTERNAL-IP   PORT(S)   AGE
service/kubernetes   ClusterIP   10.96.0.1    <none>        443/TCP   7d18h

NAME                                 READY   UP-TO-DATE   AVAILABLE   AGE
deployment.apps/someapp-deployment   2/3     3            2           7s

NAME                                            DESIRED   CURRENT   READY   AGE
replicaset.apps/someapp-deployment-6cb8dd8b8c   3         3         2       7s

C:\Leaning\Kuberbetes\deployments>kubectl describe deployment someapp-deployment
Name:                   someapp-deployment
Namespace:              default
CreationTimestamp:      Sun, 02 Jun 2024 10:30:42 +0100
Labels:                 app=someapp
Annotations:            deployment.kubernetes.io/revision: 1
Selector:               environment=development
Replicas:               3 desired | 3 updated | 3 total | 3 available | 0 unavailable
StrategyType:           RollingUpdate
MinReadySeconds:        0
RollingUpdateStrategy:  25% max unavailable, 25% max surge
Pod Template:
  Labels:  app=nginx
           environment=development
           somekey=somevalue
  Containers:
   nginx:
    Image:        nginx
    Port:         <none>
    Host Port:    <none>
    Environment:  <none>
    Mounts:       <none>
  Volumes:        <none>
Conditions:
  Type           Status  Reason
  ----           ------  ------
  Available      True    MinimumReplicasAvailable
  Progressing    True    NewReplicaSetAvailable
OldReplicaSets:  <none>
NewReplicaSet:   someapp-deployment-6cb8dd8b8c (3/3 replicas created)
Events:
  Type    Reason             Age   From                   Message
  ----    ------             ----  ----                   -------
  Normal  ScalingReplicaSet  3m5s  deployment-controller  Scaled up replica set someapp-deployment-6cb8dd8b8c to 3
When creating objects use kubectl create [object type] –help for suggestions on how to do that without a definition file.
Creating a deployment triggers a rollout.
- A new rollout creates a new deployment revision.
- When updates are performed a new rollout is triggered
- New deployment revision is created.
- When updates are performed a new rollout is triggered
Deployment -> rollout -> revision -> new rollout -> new revision
Deployment strategies types:
- Recreate strategy – first destroy all the instances and then create them back with new version
- Rolling update strategy – destroy and re-create instances one by one, thus the application has no downtime. The default strategy. When used creates a parallel replica set for the duration of rolling the update.
kubectl apply -f [definition file name].yml is used to apply the changes after modifying the definition file
Changing the number of replicas in a Kubernetes deployment does not generate a new rollout revision because the rollout mechanism in Kubernetes is designed to track changes in the deployment template, which includes changes to the pod specification (e.g., container images, environment variables, resource limits) but not changes to the number of replicas. You can scale a deployment up or down by changing the replica count without generating a new rollout revision. This allows for dynamic scaling based on load without affecting the deployment history.
In case of unsuccessful deployment update there will be some failing to run containers. Easy fix for that is to use kubectl rollout undo deployment [deployment name]. This will cancel the update and remove the temporary container (created for the rolling update).
To control how many pods can be down during a rolling update in a Kubernetes deployment, you can configure the strategy section of the deployment spec, specifically the rollingUpdate settings. The key parameters are maxUnavailable and maxSurge.
Here’s what they mean:
- maxUnavailable: This parameter specifies the maximum number of pods that can be unavailable during the update process. It can be specified as an absolute number or a percentage of the desired number of pods.
- maxSurge: This parameter specifies the maximum number of additional pods that can be created during the update process. It can also be specified as an absolute number or a percentage of the desired number of pods.
Networking
- IP addresses are not assigned to containers as in Docker.
- IP addresses are assigned to PODs
- All PODs are part of an internal private network
- IPs change when PODs are re-created. So, addressing other PODs by IPs is possible but not recommended
- In a Kubernetes cluster in different Nodes (which have some IPs of theirs) may reside PODs with (theoretically) same IPs
These are requirements we should take care of when managing networking in Kubernetes (using different external tools):
- Inter-Container Communication: Containers and PODs (groups of containers) have the capability to communicate directly with each other, bypassing the need for network address translation (NAT).
- Node-Container Network: Every node in the network has the ability to directly communicate with all containers, and all containers can directly communicate with any node, also without the requirement for NAT.
Tools for that:
- Calico
- Flannel
- Weave Net
- Cilium
- Kube-router
- Kube-proxy
- Istio
- Linkerd
- Contour
- MetalLB
- Multus
- Antrea
- Project Antrea
- OVN-Kubernetes
Services
Kubernetes Services allow for communication between components within and outside of an application.
Kubernetes Services provide a stable way to access and communicate with a group of Pods.
They ensure reliable connectivity within the cluster even if Pods change or restart.
In essence, Services make it easy to find and connect to Pods in Kubernetes.
Services help for loose coupling between some microservices in an application.
Key types are:
- ClusterIP: Internal access only. Creates a virtual IP to enable communication between different services within the cluster.
- NodePort: Exposes a Pod via a static port on each Node, making it accessible from outside the cluster.
- LoadBalancer: Creates a cloud provider’s load balancer for external access, available in supported cloud environments.
- ExternalName: Redirects to an external DNS name.
! When no type is defined in the definition file – the default one is ClusterIP.
NodePort service spans across all the nodes when created.
So, you can use any node in the cluster in combination with the Node port to access specific PODs (indirectly containers).
When using it there are three different port types in the spec:
- Port – the port of the Service (as the service itself has even and IP in the node)
- Target port – the port that is available on the POD
- Node port – the port accessible on the node from outside
It uses labels to match the PODs that the requests should be forwarded to/from.
When more than 1 match, it will use all the matching PODs as endpoints to forward the requests to.
This makes it behave like a load balancer.
NodePort automatically takes into account the deleted/created PODs
apiVersion: v1
kind: Service
metadata:
  name: someapp-service
spec:
  type: NodePort
  ports:
    - port: 8080
      targetPort: 8080 # optional - if not specified equals port
      nodePort: 31234 # optional - if not provided is automatically allocated: range 30000-32767
  selector: # a list of selectors
    environment: development # just an example

C:\Leaning\Kuberbetes\deployments>kubectl create -f deployment.yml
deployment.apps/someapp-deployment created

C:\Leaning\Kuberbetes\deployments>cd ..

C:\Leaning\Kuberbetes>cd services

C:\Leaning\Kuberbetes\services>kubectl create -f service.yml
service/someapp-service created

C:\Leaning\Kuberbetes\services>kubectl get all
NAME                                      READY   STATUS    RESTARTS   AGE
pod/someapp-deployment-7bcf675959-4tk4t   1/1     Running   0          20s
pod/someapp-deployment-7bcf675959-9nqmx   1/1     Running   0          20s
pod/someapp-deployment-7bcf675959-kxc49   1/1     Running   0          20s
pod/someapp-deployment-7bcf675959-lq7r7   1/1     Running   0          20s
pod/someapp-deployment-7bcf675959-qlfnc   1/1     Running   0          20s
pod/someapp-deployment-7bcf675959-qnshw   1/1     Running   0          20s

NAME                      TYPE        CLUSTER-IP       EXTERNAL-IP   PORT(S)          AGE
service/kubernetes        ClusterIP   10.96.0.1        <none>        443/TCP          9d
service/someapp-service   NodePort    10.102.151.198   <none>        8080:31234/TCP   5s

NAME                                 READY   UP-TO-DATE   AVAILABLE   AGE
deployment.apps/someapp-deployment   6/6     6            6           20s

NAME                                            DESIRED   CURRENT   READY   AGE
replicaset.apps/someapp-deployment-7bcf675959   6         6         6       20s

C:\Leaning\Kuberbetes\services>kubectl describe service someapp-service
Name:                     someapp-service
Namespace:                default
Labels:                   <none>
Annotations:              <none>
Selector:                 environment=development
Type:                     NodePort
IP Family Policy:         SingleStack
IP Families:              IPv4
IP:                       10.102.151.198
IPs:                      10.102.151.198
Port:                     <unset>  8080/TCP
TargetPort:               8080/TCP
NodePort:                 <unset>  31234/TCP
Endpoints:                10.1.0.193:8080,10.1.0.194:8080,10.1.0.195:8080 + 3 more...
Session Affinity:         None
External Traffic Policy:  Cluster
Events:                   <none>
ClusterIP
A ClusterIP service in Kubernetes provides an internal IP address for accessing a group of pods within the cluster. It allows communication between different services within the cluster but is NOT accessible from outside the cluster.
It requires only 2 ports in definition, as there is no nodePort – since it does not expose anything at the node level:
- port – the service port
- targetPort – the POD port
LoadBalancer
A LoadBalancer service in Kubernetes automatically creates an external load balancer to direct traffic to your service. It provides a single external IP address, making the service accessible from outside the cluster. This type works only on supported cloud platforms, where the cloud provider manages the load balancer for you.
On an unsupported cloud platform, it acts as a NodePort service, allowing access to a service by targeting any node in the cluster. The NodePort service spans across all nodes, even those without the specific service’s pods.
 Preparation (part 1)")